Saturday, October 30, 2010
Apple Oven Pancake
For Halloween weekend I went a little baking crazy. I originally intended to make Brinner one night earlier in the week but it fell through so bright and early Saturday morning I turned to our William and Sonoma Essentials of Breakfast and Brunch Cookbook for the recipe for Apple Oven Pancake.
To begin I peeled and sliced the apples and cooked them in butter and once they are soft I added brown sugar, lemon juice, and cinnamon. This is very similar to the start of an apple pie.
I then made up the batter with 4 eggs, milk flour, vanilla and salt. This batter is similar to a pancake batter , which makes sense. I then put the baking dish in the oven for 5 minutes then took it out carefully with potholders (I have burned my hand doing this before). I melted to tablespoons of butter in the hot pan and poured in the fruit and then the batter on top of it. The oven pancake cooked up in an interesting way. The batter rose up the sides and curled over and the middle puffed up. The final product was a thick crepe /apple pie.
Wednesday, October 20, 2010
Pork Wellington
We recently discovered Good Eats and while watching the episode Tender is the Pork Alton Brown fetchered a recipe for Pork Wellington a fun take on the original English beef dish. To gather the ingredients for this dinner I head the to two different gorcery stores. I first went to
Randalls and was able to get everything but dried apples and puff pastry which I surprisingly found at Whole Foods.
Step one for pork wellington is to cut off the silver skin from the pork tenderloin. The silver skin is an extra membrane that is un-editable. With a little finagling I was able to get most of it off. I then split the tenderloin in two and rotated one of the pieces so it created a gap in the middle for the stuffing, sliced up dried apples.
Then we prepped what we would wrap the pork in. We turned to one of our fav new cured meats prosciutto. On top of wax paper we laid out pieces of prosciutto so they were overlapping and then placed another piece of parchment over in and rolled over the slices with a rolling pin to seal them together. We placed the pork tenderloin on top the prosciutto and used the wax paper to help roll the tenderloin until it was covered with the prosciutto.
Next came the puff pastry . I removed it from the packaging and tried to start rolling it out but it was frozrn solid. So after re-reading the the recipe "1 sheet puff pastry, thawed completely." and letting come to room temperature, I was able roll it out so it would cover the loin. We placed the pork on the pastry and sealed it up. When then flipped it over placed in on another sheet of was paper on a cookie sheet and covered it with an egg wash so it would brown.
The finished product was beautiful. After we cooked it for 30 minutes and let is set for 10, the hardest part we were able to cut into it. The pork was cooked perfectly and had nice flavors with the apples and the yummy pastry. A perfect fall meal.
Saturday, October 9, 2010
Mediterranean Night !
When Brian and I got back from our Meditertainisn curise we wanted to have people over and share some of the recieopes we learned in our travels and entlich (finally) in October, 3 months after our cruise we had Drew and Sarah over.
We started our preperation for the evening by heading to Central Market. We wanted to get really fresh ingredients and it is just fun for Brian and I to shop there. We picked up a turban gourd for our center piece (shown above) and also some high quality prosciutto and veal. We also had fun shopping for appetizers and all the other ingredients.
We started the meal with
Bread and Olive Oil and Balsamic Vinegar
we bought it in Greece
Dolma
which is a grape leaf wrapped around rice or other items
Tapenade
which is a mix of finely chopped vegetable usually olives and garlic that you can top on bread .
Grilled Eggplant with Feta
The recipe for the grilled eggplant came from William Sonoma Bride and Groom Entertaining. We started by slicing the egg plant really thin using our mandolin and then coated the pieces with olive oil, salt and pepper.
Brian used our grill pan to grill the eggplants and ended up filling our apartment with smoke. We opened all the doors and windows and used a fan to usher it outside. Luckily, by the time Drew and Sarah arrived it was all clear. I then made the filling for the egg plant out of ricotta cheese, feta cheese, basil, and allspice. I carefully rolled up eat eggplant slice starting with the large end. They tasted delicious and even Brian who hates egg plant liked them.
We went overboard!
For the Main Coarse again entlich(finally) a Mario Batali recipe like you voted one. We chose Roman- Style Veal Cutlets with Sage - Saltimbocca alla Romana from his cookbook Molto Italiano: 327 Simple Italian Recipes To Cook At Home
To begin we took a veal cutlet placed a sage leaf and a slice of prosciutto on top of in.Then we folded it and pounded it lightly with the meat mallet to keep it together. We then melted butter in the skittle, dredged the veal in flour and then cooked it only tow minutes on each side.
To make the sauce we used white wine to deglaze the pan and added in more butter. The result was amazing but I have yet to meet a meal that did not taste amazing that included veal, prosciutto, and butter.
We greatly enjoyed sharing our pictures and some of the new flavors we learned on the cruise with our friends.
We started our preperation for the evening by heading to Central Market. We wanted to get really fresh ingredients and it is just fun for Brian and I to shop there. We picked up a turban gourd for our center piece (shown above) and also some high quality prosciutto and veal. We also had fun shopping for appetizers and all the other ingredients.
We started the meal with
Bread and Olive Oil and Balsamic Vinegar
we bought it in Greece
Dolma
which is a grape leaf wrapped around rice or other items
Tapenade
which is a mix of finely chopped vegetable usually olives and garlic that you can top on bread .
Grilled Eggplant with Feta
The recipe for the grilled eggplant came from William Sonoma Bride and Groom Entertaining. We started by slicing the egg plant really thin using our mandolin and then coated the pieces with olive oil, salt and pepper.
Brian used our grill pan to grill the eggplants and ended up filling our apartment with smoke. We opened all the doors and windows and used a fan to usher it outside. Luckily, by the time Drew and Sarah arrived it was all clear. I then made the filling for the egg plant out of ricotta cheese, feta cheese, basil, and allspice. I carefully rolled up eat eggplant slice starting with the large end. They tasted delicious and even Brian who hates egg plant liked them.
We went overboard!
For the Main Coarse again entlich(finally) a Mario Batali recipe like you voted one. We chose Roman- Style Veal Cutlets with Sage - Saltimbocca alla Romana from his cookbook Molto Italiano: 327 Simple Italian Recipes To Cook At Home
To begin we took a veal cutlet placed a sage leaf and a slice of prosciutto on top of in.Then we folded it and pounded it lightly with the meat mallet to keep it together. We then melted butter in the skittle, dredged the veal in flour and then cooked it only tow minutes on each side.
To make the sauce we used white wine to deglaze the pan and added in more butter. The result was amazing but I have yet to meet a meal that did not taste amazing that included veal, prosciutto, and butter.
We greatly enjoyed sharing our pictures and some of the new flavors we learned on the cruise with our friends.
Wednesday, September 29, 2010
Baked Macaroni and Cheese
We were both feeling sick and looking for some comfort food that was not just chicken noodle soup. So once again I consulted by favorite foodie Alton Brown and found just what I was looking for Baked Mac and Cheese
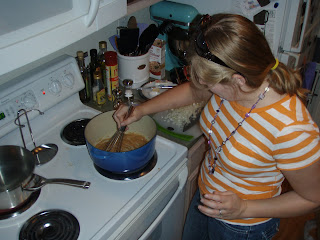
The first step was to make a roux. Now again I tried to make a roux before when I was making Rachel Ray's Mac and Cheese and it ended badly with a bunt and runny mess. The roux starts by mixing butter and flour and not very much of each. One valuable lesson of cooking I have learned is "Mise en place, "when you get all your ingredients out and measured before you start cooking. This is especially important when you are cooking something like a roux that requires constant attention. So I was ready with all my ingredients ready and by the stove and I got out my trusty Dutch oven, melted the butter and then whisked in the flour for 5 minutes. If you stop whisking the flour will burn.
After the base of the roux was made I added milk, onion, bay leaf, and paprika and allowed it to simmer for 5 minutes. Then I added in an egg which at first I thought was weird but helped to bind the mac and cheese together. After the egg was added finally I stirred in the cheese and then added the cooked macaroni. I poured it into the baking dish and then added more cheese on top.
For the final step I sauted some Panko breadcrumbs in butter and then spread them on top. After baking for 30 minutes and letting it rest for 5 minutes the result was a some really really tasty comfort food.
Sunday, September 26, 2010
Glazed Carrots
We have really enjoyed watching Good Eats by Alton Brown. It is a food science show that show how to turn ordinary recipes into really well... good eats. His show on carrots showed a great way to make glazed carrots. As Brian is not a big veggie eater I am always looking for tasty way to prepare them.
The first step is to peel and cut the carrots in the even pieces so they can all cook at the same time. Then we sauteed them in butter, salt and ginger ale. The ginger ale is the base of the glaze and adds a sweet element with out being too sugary. The carrots cooked for about ten minutes and then we added chili powder and cooked in some more until the ginger ale turned to a glaze. They were so tender and sweet and we served them along side Shake and Bake chicken.
Wednesday, September 22, 2010
Slow Cooked Korean-Style Short Rib Soup
In love with our slow cooker and how it allows us to create great meals with not a lot of prep we turned to Food Network Kitchens to find a new recipe. I stumbled upon Short ribs. I have always wanted to cook short ribs but never knew how and the Korean flavors and ingreatands looked really good. First I placed the short ribs in the crock pot and then created their braising liquid; chicken broth, soy sauce, sugar, ginger, Korean red chili paste, sesame oil, garlic, and the white part of green onion. I was excited for dinner even as I made the broth because I know it would be so tasty with all of these flavors.
About 30 minutes before the ribs were done we made the rice noodles and prepared the garnishes which entailed grating carrots, slicing cucumbers, tearing cilantro leaves from stems, cutting the green parts of the onion and slicing limes. We served up a rib still on the bone and served it over noodels with the braising liquid and the garnishes you wanted. The ribs were so tender and the flavors were really rich.
Monday, September 20, 2010
Celebration Dessert
For dessert at the celebration dinner I made Coconut - Lime Cupcakes. When I first got my cupcake cook book as a wedding present these were the first cupcakes I made. This was pre blog. The first step in making the Coconut lime cupcakes (CLC) is to make a normal vanilla cupcake with coconut extract instead of vanilla extract and shredded coconut. Then after the cupcakes cool you core out the middle in order to create a pocket for the lime curd. I used a paring knife and cut in a circular motion. The tricks are do not great too deep of a pocket and do not cut your hand.
Cored out cupcakes half with lime curd.
To make the lime curd requires the zest of two limes and there juice as you can see by the picture below cutting, zesting and juicing require several kitchen tool. I think whisked together the lime juice, sugar, egg yolks butter and zest over low heat. The result something delicious. I then filled the cooled cupcakes.
Next step making the coconut buttercream. Now as I stated I had made the cupcakes before and the first time I made them the buttercream turned about perfect. The last two times I tried to make buttercream Christmas cupcakes and Chocolate cupcakes the buttercream turned out really thick and has the coistnacy of butter with a bit of vanilla floaoring. The cupcakes I have made since then I have either made a different icing or used store bought :( But today I wanted to try my hand a buttercream. This time I made sure the butter and and egg whites were at room temperature. The first step of a successful buttercream is combining the egg whites and sugar together in a bowl over a pot of hot water and stirring like crazy until the sugar is totally dissolved. I made sure not to skimp on the timing of this step and that the sugar was very warm to the touch.
Then I poured the mixture into our electric mixer and stirred on high for 6 minutes. I made sure the mixture was forming stiff peaks. Then I added the butter in slowly, two pieces at a time and made sure they were well mixed in. This process took a while because you use 16 pieces. At the end of this process I had created a perfect buttercream. Creating a buttercream is tricky and requires finesse but in the end it is well worth it and taste way better then store bought icing.
After the icing was made i added in coconut extract and put it in a piping bag and then iced the cupcakes with swirls of icing and dusted them with coconut. Delicious.
Celebration Dinner
After a very busy season on campus I had my students leaders over for dinner to celebrate all the hard work we had put in and Brian and I planned a great menu.
Pork Paillards with Sour Cream-Paprika Sauce from a previous blog post.
Ugly Ducking Salad - Aarti Party ( a new show on food network)
A dessert ( See next blog post)
Brian worked on the pork while I tackled the salad
The ugly duckling is called such because it contains celery root, possibly the ugliness vegetable I have ever seen. It reminds we of a Mandrake, from Harry Potter. Celery root is actual celery but grow to be the root from the the green stalks.
I started the salad by making the dressing. The first step, shelling the pistachios and then toasting them. I should have bought pre-shelled pistachios because I had the shell over 30. The toasting only took a few minutes and I could tell that they were done when you started to smell very tasty.
I then placed the pistachios in a blender with garlic, lemon juice, hot sauce, oil and hot water, to help with the break down of the nuts. The result was a really really thick brown sludge, which was not very appetizing or dressing like. So I added more water and oil until the paste thinned. I then prepped the rest of the salad, spinach apples and the celery root. The spinach was prepacked and Andrea, one of my students, helped me cut the apple. Then I turned to the celery root. Celery root browns very easily when exposed to air like potatoes or apples. I peeled the celery root and then grated it. It took a long time to grate that very large celery root and eventually Joel, another student took over and finished the job. He grated at a much faster rate. Then i toasted it all together and dinner was served.
Wednesday, September 15, 2010
Pulled Pork with Root Beer Sauce
Well is has been a long time coming. After we got back from the cruise we took the summer off and just tried not to use the stove or oven much as it makes our place too hot. My work is really busy at the beginning of the school year so I was excited when I had the brainstorm to use the crock pot . I turned to my Better Homes and Gardens Cookbook and found Pulled Pork with Root Beer Sauce.
In the morning I cut the fat of the pork roast and then seared in in a skillet. I was a bit tricky as I maneuvered the 3 pound roast on its side with tongs to get the complete sear. I then plopped it in the crock pot and cut up some onion and garlic and added the root beer. Then I set i to low and let it cook for 8 hours.
Right before the roast was done we made a sauce with root beer and chili sauce, which looks like ketchup but has more of a kick. We let it simmer for 30 minutes until it reduced from 3 cups to 2 cups. This is always hard to gauge for me. I always think it is reduced enough and then when I pour it into a measuring cup it is usually not even close to the correct amount. This time was no exception and required that we pour the sauce from measuring cup and back into the pan at least twice.
After the meat was finished we transferred it to a cutting board and used two forks to shred it. I was so surprised how easily it fell a part. We served it up on hamburger buns with the sauce. Yum !
Wednesday, July 14, 2010
Parmesan Chicken and Rice Casserole
A nice at home meal is what I had in mind when I picked Parmesan Chicken and Rice Casserole paired with Green Beans in Warm Bacon Dressing and Broiled Plum Tomatoes. It was all listed together in Cooking Light magazine. I began by preparing all the ingredents while the oven preheated to 450. I chopped a white onion and bulb onions and snapped and washed the green beans. I started the casserole by cooking onions and garlic in a skillet and then adding a bag of boil in bag rice. It is the type of rice you can cook in a pot of boiling water. It looked like whole wheat Rice Krispies. I emptied the bag into the skillet and cooked it for 30 seconds and then a splash of white wine. After the wine burned off I spooned the rice into the bottom of a casserole dish. I placed the chicken thighs on top of the rice and seasoned them with thyme and salt. then I poured a mixture of chicken broth and whipping cream over the casserole and in the oven it went.
I quickly sliced the plum tomatoes and placed the on a cookie sheet and they also went into the oven to broil. I began cooking the bean in boiling water and bacon in a skillet. When the beans were done I drained them and focused on the bacon. After the bacon finished I removed it from the pan and added my sliced bulb onions to the bacon grease. I need to stir them constantly as to not burn them. In the middle of cooking the onions the timer when off for the casserole and I had to quickly open the oven and sprinkle Parmesan on the chicken. When I returned to the onions they were burnt. I added white wine vinegar to finish the warm bacon dressing and and smoke rushed at me and quickly filled the whole kitchen. I continued to stir with gusto for thirty more seconds and finally added the beans to coat them. I served them with crumbled bacon on top.
The dinner came together very nicely and it almost did not all fit on one plate. The beans tasted great despite the overdone onion because of the bacon grease and the tomatoes turned out nicely. We will make it again and add a few changes to spice up the chicken a little bit and we will probably use white meat instead of dark.
Monday, July 12, 2010
4th of July Pie
What started as inspiration from the July issue of the Martha Stewart Living magazine ended in a beautiful creation between mom and daughter. Fourth of July has always been a fun holiday for my fmaily. Our usual tradition is to have a cook out nad then go see fire works. this year my paretns came to visti Brian and I and it was turn to host the Fourth. I planned a great menu; turkey burgers, corn on the cob, sweet potato fries, the PIE and home made vanilla ice cream.
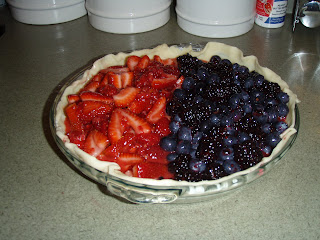
We made the pie in the morning. In Martha's original recipe you make six mini pies and decorate them each differently. I decided to make one pie and make it look like the American flag. She also had two filling options Raspberry-Strawberry or Blueberry- Blackberry. I decided to make both filling and use the blue filling for the stars and the red for the stripes.
We started with a lot of berries. 1 1/2 cups of each berry. Mom washed and cut up the berries and I readied the other ingredients. We mixed the blue berries and red berries in separate bowls and added sugar, cornstarch and lemon juice.
Then it was time for the tricky part filling half the pie with each filling. We lined the pie tin with a Pillsbury roll out crust. I don't make pie crust, Martha. Then I held two spatulas in place over the middle section of the pie and mom poured in the first filling. Then I kept then in place and she poured in the second. I removed the spatulas and it worked. The blue stayed on one side and then red on the other. Now time to make the flag. I used my star cookie cutter to cut out stars for the other sheet of dough and we attached then to the outer crust and each other using an egg wash. Then Mom made strips using a pizza cutter and placed then across the pie. It looked so great. We then had to freeze the pie for an hour and then baked in for 50 minutes.
After the fire works we served it up with the ice cream. I had to microwave my piece because I cannot eat cold fruit pie, but everyone else enjoyed it as is. The verdict, delicious... lots of seeds.
Subscribe to:
Posts (Atom)